

Can I Add New Animations To Existing Blendshape
This section shows you how to create and edit blend shapes to animate facial expressiveness. A alloy shape is used to morph between a main shape and whatsoever number of target shapes. Information technology is an like shooting fish in a barrel and efficient way to have your character's face deform smoothly from i facial expression to another. Multiple blend shapes tin can be mixed while animating to produce a wide variety of facial poses. This department also shows y'all how to correctly combine leap influences and blend shapes on the confront skin to produce the best results.
Tips for Making Target Shapes
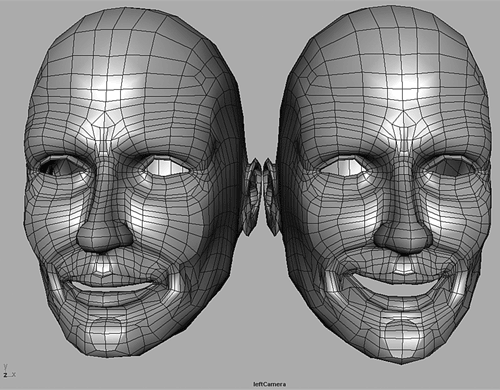
The about efficient fashion to create blend shapes is to create dissever targets for each expressive expanse of the face. The 2 main expressive areas on a face are the area of the eyes and the area of the mouth. The reason you want to separate these facial areas when creating targets, every bit opposed to making split targets for the whole face, is to enable y'all to mix areas of expression during animation. Instead of making an angry face up target, and a happy confront target, you make an angry eyes target, angry mouth target, happy eyes target, and happy mouth target. You tin can so mix the targets, combining angry eyes with a happy mouth for instance, to create a maniacal expression (see Figure 5.9). Simply exercise the math to see how this is more than efficient. If you create 6 centre shapes and 6 mouth shapes, you lot accept 36 possible combinations of shapes. This is much more efficient than creating 36 target shapes for the whole face up, because you lot just had to create 12 shapes to get the same number of expressions.
5.9. Separating the expressive areas of the face into singled-out alloy shape targets enables you to mix areas to create new expressions, such as mixing a happy rima oris with angry eyes.
The best way to ensure your target shapes work correctly is to create them by duplicating the main head. If your main head is made from multiple surfaces, such as a NURBS patch head, group all the surfaces and indistinguishable the group to create the targets. Because yous will be using only the component information to create the blend shapes, you tin transform the target heads away from the main head to make it easier to modify them. You can too scale them if they are taking likewise much space. In addition, because creating blend shapes only involves animating the components of the master head, it is important to make certain you do not change the basic component structure of the targets. Points on the main head are numbered in a specific way, and the target shapes take to retain the same numbering scheme to create a smooth alloy between the shapes. Therefore, you shouldn't add points, delete points, or cut the surface of target shapes. Also avoid making any adjustments to the eye pivots, such as moving them in insert mode. Components are registered in relation to the center position, and modifying the center pivots may make your blend shapes shift the main head out of position.
As long every bit you move points simply on your target shapes, your blend shapes should morph smoothly and predictably. Y'all can utilize any tools or techniques that move only points to practise this, such as using the Sculpt Surfaces tool or Surface Editing tool. When modifying each target, avoid moving any points that are not in the expressive surface area of the face that you are working on for that particular shape. For case, do not motion whatsoever points in the eye area if you are working on a mouth shape. When you create the blend shape, Maya copies only the component information that has been modified on the target caput to the main head. This enables you to mix the expressive areas of the face up without any bug. Finally, when y'all accept finished adjusting all the target shapes, give them short, descriptive names.
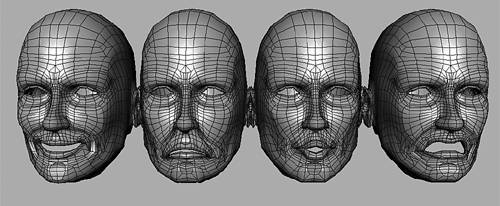
Effort to create plenty target shapes to move each area of the face. The oral cavity and eye openings should all have shapes that close them. Some basic expressions that you desire to create in the rima oris and eye areas are: happy, lamentable, angry, and surprise (see Effigy 5.10). In improver, if your character is going to be blithe to talk, brand a set of shapes for the mouth that will be used for lip-syncing. These should encompass shapes for vowel sounds such as A, E, I, O, and U, besides as shapes for consonant sounds such as M, K, Fifty, and V.
five.x. A full set of blend shapes should include basic expressions for each area of the face, such as happy, sad, aroused, and surprise mouth shapes.
Assigning Blend Shapes to the Skin
To create blend shapes for your character, you hold downwards the Shift key to select all the target heads and Shift-select the main head last. If you lot have multiple surfaces, follow the same procedure with the group node parents. When everything is selected, on the elevation menu bar cull Deform, Create Blend Shape ![]() . In the resulting options box, type a name for the blend shape node. It is often best to put all the shapes for the face on a single node, which makes it easier to mix the shapes together. Leave the envelope weight value at 1 for a total weighting of each shape to the skin.
. In the resulting options box, type a name for the blend shape node. It is often best to put all the shapes for the face on a single node, which makes it easier to mix the shapes together. Leave the envelope weight value at 1 for a total weighting of each shape to the skin.
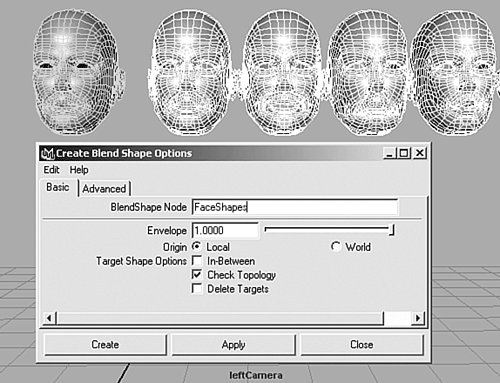
For caput shapes, you too want to set up the Origin pick to Local, and make sure the In-Between option is checked off. This setup assigns only the component information from the target heads to the main head and creates a separate slider for each target shape so that they can be mixed. Choosing the World option assigns both the component and transform information from the target heads to the master head and causes the main caput to shift to wherever each target head is positioned. Turning on the In-Between option creates a single slider that contains all the target shapes in a specific order. Use these options when you demand to morph something from 1 place to another in your scene. For instance, you could position several target models of a bird in diverse stages of flight in a scene and plow on Global and In-Betwixt to create a slider that makes the bird fly through the scene.
Finally, make sure the Cheque Topology option is turned on and the Delete Targets pick is turned off. Y'all should use the Cheque Topology option whenever your target shapes are duplicated copies of your master head; this option ensures that Maya creates a predictable morph based on the point-numbering scheme of the target and main head models. Only plough this option off if yous are trying to morph objects that were not created with the same construction, such equally morphing a homo into an creature. Maya and so bases the morph on where points are positioned in 3D space, instead of basing it on their numbers. Deleting the targets should be washed later, after you make sure all the alloy shapes are working correctly. When all the options are fix, click the Create button to assign the blend shapes to your main head (meet Effigy five.11).
5.11. Set all the alloy shape options and click the Create button to assign the blend shapes.
Mixing and Animative Blend Shape Sliders
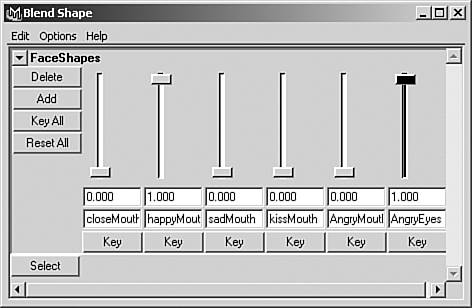
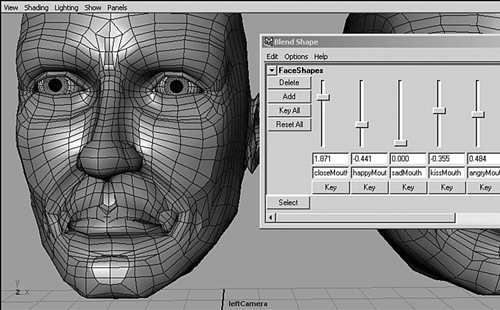
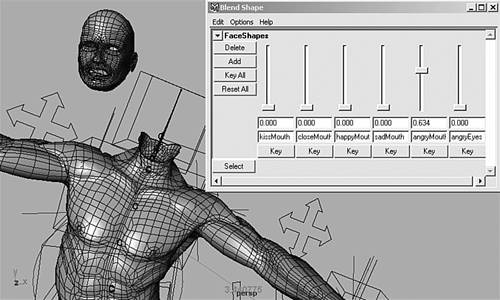
Subsequently you lot have assigned alloy shapes to a character's head, y'all open the Blend Shape Editor to mix and animate them. Practice this by choosing Window, Blitheness Editors, Blend Shape. Inside the editor, you will come across multiple vertical sliders in a horizontal row (see Figure 5.12). The sliders stand for target shapes, and the name of each target head displays below each slider. Each slider's limit goes from 0 to 1, with 0 representing no shape, and 1 representing a full shape. Moving several sliders enables yous to additively mix shapes together on the primary head. For case, mixing a Close Mouth slider with a Happy Mouth slider creates a closed-mouth smile pose. Experiment with dissimilar combinations to see what looks good. If y'all want to animate specific sliders, move the sliders as needed, and click the Key buttons beneath the appropriate sliders. To set keys on all the sliders, but click the Key All button to the left of all the sliders. Clicking the Reset All button sets all the sliders back to their original value.
five.12. Open the Alloy Shapes Editor to mix blend shapes by manipulating the vertical sliders.
Likewise go along in listen that each blend shape slider is associated with a aqueduct that exists on the blend shape node. Click the Select push to select the alloy shape node, and view the blend shape channels (encounter Effigy five.thirteen). Considering all the channels tin be animated, you can later connect controls to your character's blend shapes using expressions, the Connection Editor, or by setting driven keys.
v.13. Click the Select button in the Blend Shape Editor to select the blend shapes node, which displays the blend shape channels in the channel bar.

Editing Alloy Shapes
You tin can adjust the default limits set on the alloy shape sliders in a couple of means. Ane way is to select the alloy shape node past clicking the Select button in the editor, and so setting the weight channel to a value above or beneath 1. Setting it below 1 causes all the sliders to produce less of a shape, whereas setting information technology to a higher place 1 causes all the sliders to get across their target shape. To have more control, still, exit the weight setting at 1, and type values in the fields below each slider to change their individual limits. For instance, with a slider set on 0, blazon in a value of 1 in the field to reset the minimum limit. And so movement the slider to one, and type in a value of ii in the field to reset the maximum limit. Then, if yous move the slider below 0 or above ane, the points on your character'south face up continue moving to create extreme confront shapes. Sometimes these shapes practise non expect very good. Sometimes, however, you lot will get some surprisingly useful new expressions that yous didn't even take to create. For instance, setting a slider that closes the oral fissure to to a higher place 1, and other sliders to below 0, can create an unusual oral cavity pose that was non expected (see Figure 5.14).
5.xiv. Setting the slider limits above 1 and below 0 can sometimes produce useful new shapes.
You also can edit existing blend shapes by modifying the target shapes. A history connexion exists between the target heads and the chief head, which updates the main head whenever a target is modified. This is one of the reasons you lot don't desire to delete the target heads when you create your blend shapes.
You can add new blend shapes to a blend shape node in a couple of means. To add a new target head as a alloy shape, select the target and Shift-select the master head, and and so cull Deform, Edit Blend Shape, Add ![]() . In the resulting options box, yous can specify which blend shape node you want to add information technology to, and where to place it in an in-between or serial slider. For a caput with a unmarried alloy shape node, leave all the options turned off except the Check Topology selection. The other fashion to add a alloy shape is to create a new shape from mixing existing sliders. If you use a combination of sliders a lot, you may desire to create a dissever slider for that shape. Y'all do this by moving the sliders into place, selecting the main head, and clicking the Add button in the Blend Shape Editor. This creates a new slider and target shape, which yous can move to the side or delete. Then you can reset all the sliders, give the new slider a name, and test it to make certain information technology creates the desired shape. Another use for the Add push is to create in-between sliders for your master target shapes. 1 problem with blend shapes is that when a slider is at .v, the shape produced may not exist entirely accurate. Maya moves points in a straight line from no shape at 0, to a full shape at i. This is non how the muscles in a existent confront move, because flexing doesn't always occur in a straight line. To reduce this problem, you could create an in-betwixt shape for each expression. Only set up the slider to .5, and click the Add together button with the main head selected. Motility the new target head to the side, and proceed to adjust the shape to be more accurate (see Effigy 5.15). Then to brand the shapes occur in the correct order, create a custom aqueduct that will drive both alloy shape channels. For example, you starting time create a Head.grinning channel on the Head box that goes from 0 to 10. And then you lot load the Caput box into the Set Driven Key options box as the driver, and click the Select button in the Alloy Shape Editor to select the blend shape node, and load it in as driven. You then use driven keys to make the Head.smile channel drive the MouthShapes.halfSmile aqueduct and the MouthShapes.fullSmile channel. Set up the keys and so the rima oris shape goes to a half grinning when the driver channel is animated from 0 to five, and the oral fissure shape goes to a full grinning when the same channel is blithe from 5 to 10. Because the two channels are additively mixing, you may also need to set up another driven key to reduce the one-half-smiling slider at 10. This gives you a smoother transition betwixt shapes during blitheness.
. In the resulting options box, yous can specify which blend shape node you want to add information technology to, and where to place it in an in-between or serial slider. For a caput with a unmarried alloy shape node, leave all the options turned off except the Check Topology selection. The other fashion to add a alloy shape is to create a new shape from mixing existing sliders. If you use a combination of sliders a lot, you may desire to create a dissever slider for that shape. Y'all do this by moving the sliders into place, selecting the main head, and clicking the Add button in the Blend Shape Editor. This creates a new slider and target shape, which yous can move to the side or delete. Then you can reset all the sliders, give the new slider a name, and test it to make certain information technology creates the desired shape. Another use for the Add push is to create in-between sliders for your master target shapes. 1 problem with blend shapes is that when a slider is at .v, the shape produced may not exist entirely accurate. Maya moves points in a straight line from no shape at 0, to a full shape at i. This is non how the muscles in a existent confront move, because flexing doesn't always occur in a straight line. To reduce this problem, you could create an in-betwixt shape for each expression. Only set up the slider to .5, and click the Add together button with the main head selected. Motility the new target head to the side, and proceed to adjust the shape to be more accurate (see Effigy 5.15). Then to brand the shapes occur in the correct order, create a custom aqueduct that will drive both alloy shape channels. For example, you starting time create a Head.grinning channel on the Head box that goes from 0 to 10. And then you lot load the Caput box into the Set Driven Key options box as the driver, and click the Select button in the Alloy Shape Editor to select the blend shape node, and load it in as driven. You then use driven keys to make the Head.smile channel drive the MouthShapes.halfSmile aqueduct and the MouthShapes.fullSmile channel. Set up the keys and so the rima oris shape goes to a half grinning when the driver channel is animated from 0 to five, and the oral fissure shape goes to a full grinning when the same channel is blithe from 5 to 10. Because the two channels are additively mixing, you may also need to set up another driven key to reduce the one-half-smiling slider at 10. This gives you a smoother transition betwixt shapes during blitheness.
5.fifteen. Use the Add button to create in-between shapes for a particular expression. Then bulldoze the half shape and total shape with one custom channel to produce a more than natural alloy.
Another way to edit your sliders is to reposition the club of the sliders. To swap the order of two sliders, Shift-select the 2 target heads, and cull Deform, Edit Blend Shape, Swap ![]() . Set the option just if you have multiple alloy shape nodes on your head and y'all demand to specify the node on which you want to bandy sliders. Finally, to remove specific sliders from a blend shape node, select the target head and Shift-select the main head, and choose Deform, Edit Blend Shape, Remove
. Set the option just if you have multiple alloy shape nodes on your head and y'all demand to specify the node on which you want to bandy sliders. Finally, to remove specific sliders from a blend shape node, select the target head and Shift-select the main head, and choose Deform, Edit Blend Shape, Remove ![]() . Set the options if needed, and click Apply and Shut. This removes a slider and shifts the residuum of the sliders together. To remove all the sliders, and delete the alloy shape node, just click the Delete push to the left of all the sliders.
. Set the options if needed, and click Apply and Shut. This removes a slider and shifts the residuum of the sliders together. To remove all the sliders, and delete the alloy shape node, just click the Delete push to the left of all the sliders.
Reordering Deformers
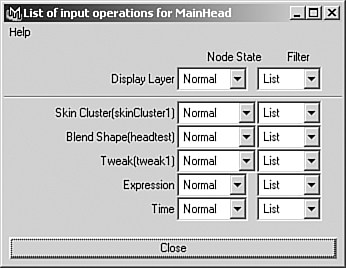
Ane affair y'all have to be enlightened of when assigning both blend shapes and influences to your character's pare is that the order of the deformers makes a difference. In nigh cases, the skinCluster node should exist evaluated subsequently any alloy shape nodes. If y'all demark your character'south head start, and then add alloy shapes later on, the nodes are in the wrong lodge. This wrong order causes the head to shift when you animate the blend shapes on top of the skeleton controls. To avoid this problem, just right-click the skin to choose Inputs, All Inputs to reorder the deformers. This action opens a list that goes from bottom to peak, called a stack, with the final thing in the list being at the top. To reorder the deformers, hold down the centre mouse button to drag the skinCluster node beneath the blend shapes node (see Figure 5.16). Go on in heed that you can but elevate downwards, non upwardly, in this list. Y'all must practice this on all skins that contain both a skinCluster and blend shape node in the wrong society.
v.16. If your character's head shifts when combining skeleton and blend shape deformations, right-click the pare to reorder the deformers so that the skinCluster node is above the alloy shapes node.
Do 5.two
Adding Face up Blend Shapes
In this exercise, you add some alloy shapes for deforming the eye and oral cavity areas of your jump head. You lot likewise brand sure the order of deformers is set correctly so that your head peel doesn't shift when animated. Then y'all utilize your alloy shape sliders to create boosted targets for one-half shapes, and breathing them using custom channels.
-
Duplicate your main caput, or a grouping node parent if your head is composed of multiple patches, and move each target away from the principal head so that it is piece of cake to see. Scale all the targets if necessary to brand them fit more hands onscreen. Name each target head co-ordinate to the expression, such as full Smiling, fullGrimace, and fullClose. Cull the names so that each target specifies a particular shape for either the mouth expanse or the eyes expanse.
-
Create the blend shape connections between the targets and the main head before you even start making modeling adjustments to the targets. This ensures that the blend shape connection is working correct from the beginning. Practise this by selecting all the target heads, and then Shift-select the master head last. If you are using grouped multiple patches, select all the group node targets, and Shift-select the main caput group last. So choose Deform, Create Blend Shape
 . Proper name the blend shape node FaceShapes, gear up the Envelope option to ane, and set the Origin selection to Local. In-Between should be turned off, Check Topology should exist turned on, and Delete Targets should be turned off. Click the Create button to assign the target shapes to your graphic symbol's master head.
 -
Examination your head skin by crouching your graphic symbol, and so open the Alloy Shape Editor to move one of your sliders. If your head shifts back to its default position when you move the slider, you must change the order of the deformers (meet Figure 5.17). Practise this by correct-clicking the head skin, and choose Inputs, All Inputs. In the resulting list, employ the centre mouse button to elevate the blend shapes node beneath the skinCluster node. When the lodge is correct, effort moving your graphic symbol out of its default position again, and then open the Blend Shape Editor to test each slider. You should non run across any shifting occur when you move each slider from 0 to 1. If you do, something else happened in the creation of the targets to modify their structure so they don't match the master head, and you lot may have to remake them.
5.17. If your head shifts when you combine moving your skeletons and blend shape sliders, modify the guild of deformers on the Inputs of your head peel.
-
When all the blend shapes are working correctly, start modeling each target face expression past manipulating points. After you have finished the full expressions, use the existing sliders to create in-between expressions. Do this by setting each total expression slider to a .v value, and then select the primary head and click the Add together button. Transform the new target equally needed, and give them names such every bit halfSmile, halfGrimace, and halfClose. Motion points on the half-shape targets to create natural variations. So create custom channels on the Head box to drive the sliders to go from no shape to a one-half shape to a full shape. Set driven keys on the blend shape channels, with your custom channels loaded as the drivers. Each custom expression channel should drive a half-shape channel so that it produces a half shape at .5, and move a respective full-shape channel so that it produces a full shape at 1.
COntrolling a Character's Face with a Dummy Caput
One technique that you may find useful is to create all your head controls on a separate copy of your character's main head. The master head is assigned but to a head skeleton, so information technology moves with the torso. The copy is then assigned to a separate caput skeleton, jaw skeleton, and all the other face deformers. These can include confront skeletons, blend shapes, influence curves, and lattices, but the caput copy will not move with the character'southward body. You may even want to create a special photographic camera that only looks at the re-create, or dummy head. Finally, to brand all the deformations on the dummy head announced on your character'south master head, create a single blend shape between the ii. Assign the dummy caput as the target, and leave the blend shape slider for the dummy caput always fix to 1. This ensures that all the deformations created on the dummy head are transferred to the chief head through a blend shape connectedness.
This technique separates the trunk animation from the face animation. You can then animate the body first, with the dummy head hidden on a layer, and animate the face up afterward. Using a dummy caput makes information technology easy to observe and view the face. You lot can likewise hide the graphic symbol'southward body to concentrate on only the face up blitheness after yous have established the timing of the torso animation. Alternatively, you can animate the dummy caput in a completely separate scene, and import information technology afterwards to utilise every bit a alloy shape target for the main head of your character.
Source: https://flylib.com/books/en/2.770.1.39/1/
Posted by: tedescobutibill79.blogspot.com
0 Response to "Can I Add New Animations To Existing Blendshape"
Post a Comment